
I Found these lightweight earrings and decided I wanted to give them a little color.
I used acrylic paint and foam brushes. I gave them each 3 coats of paint.
They turned out really cute! Perfect colors for summer!


I Found these lightweight earrings and decided I wanted to give them a little color.
I used acrylic paint and foam brushes. I gave them each 3 coats of paint.
They turned out really cute! Perfect colors for summer!

I made myself a monogram purse a week of so ago. I love purses they will always be my number one obsession! I showed my Mom and she said she wanted one so I made her one as well. I did my purse in gold and she decided she wanted her’s black, I like how they both turned out but for picture purposes the black looks better.
I used my Silhouette Cameo to cut the stencil out of contact paper. I always do my stencils out of contact paper because it is cheaper than vinyl and works great.
Make sure you push all your edges down REALLY GOOD! If you don’t it will bleed and look messy. I took my finger nail and pushed all the edges down two or 3 times.

I used black acrylic paint and a foam brush. First do you strokes vertical and then do another coat horizontally. By doing this you will get less of a streaky look.

They both turned out great! I like the distinct look of the black and the gold is a little more subtle.

I decided it was time to make my nails a little patriotic. I did cute little stars on my fingers and USA on my toes. I used my Silhouette Cameo and vinyl to make my decals. I used normal polish and shellac top coat this time so I am hoping they will last till the 4th! I’ll keep you updated if they made it or not! 

 Happy Fourth of July! God Bless America!

I wanted to do a cute banner for my fireplace that was Fourth of July themed.
I knew I wanted to do a “rag” banner so I went to the clearance fabric section at Hobby Lobby.
They had a red star pattern, and a navy blue polka dot pattern. What are the chances?

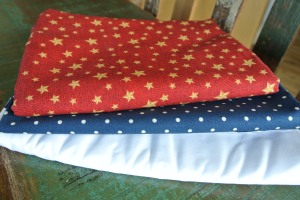
Next I got my rotary cutter and mat out and decided I wanted my strips to be 1 inch. Unfortunately my blade had a dull spot 😦 This step ended up taking a little longer because I had to cut pieces that didn’t get cut with scissors. I had already started and didn’t want to go to the store to buy a new one.
Here are my 1 inch strips.
Then I got my twine out and measured it against my mantel. I just tied a knot around the string.

Looks pretty cute over my fireplace!

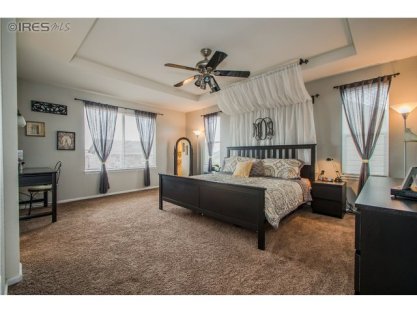 We moved last year into our new house and I’ll be posting about our many projects. I wanted to share our old master bedroom. It was so special because it was our first project we did together. It is so beautiful and there are times I miss it. My husband strung clear lights behind the white curtain behind our bed so it lit up at night. He also surprised me with my beautiful vanity as my wedding gift. This room will always be special to me!


I had a few extra monograms after I got done doing my Monogram Nails. So I was thinking of where to put them. My sunglasses seemed like the perfect place!
What do you know? They fit PERFECTLY! I love when things work out like that. Check out my Monogram Nail Decal post to see how I made these.


I told you I am obsessed! I needed a pair of monogram earrings. I found these cute earrings and thought they were the perfect canvas to put a monogram on! I wanted to try pearls, but had a difficult time finding ones that were big enough.
First I went to Mark and Graham to create my “round” monogram. I measured my earrings and luckily got it right on the first try. Again I used my Silhouette Cameo to cut the vinyl. I then got my trusty tweezers out, I think tweezers are a must when working with vinyl, then I positioned them on the earrings.
I have had so many compliments on them! I still want to try some round pearls, just need to find some that are big enough!


I LOVE NAIL ART. I have done it by hand quite a few times. The problem for me is that my left hand always looks great and my right not so much.
I am always impressed with how interact my Silhouette Cameo cuts, so I decided to give nail decals a try.
This was my first try with doing nail decals. I love doing these designs with vinyl because they both look the same and stay really well.
I wore these for about a week and half before I noticed any chipping, although the decal was in perfect shape! I did use a shellac top coat on these so I think that has some to do with the wearability of these!

My current obsession…all thing monogrammed! That includes my nails. I used my Silhouette Cameo and white permanent vinyl. I do my own shellac and did a shellac top coat over this the vinyl monogram. I used tweezers to get them placed on my nails.

This picture was taken after one week.


I recently found a love for Monograms! I am not sure what sparked this new excitement, but now I feel the need for everything to be monogrammed.
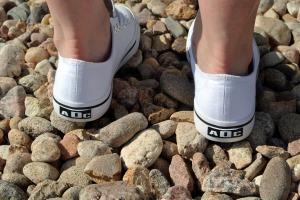
I found some really cute monogrammed shoes online and I thought “I can do this”. Mind you they aren’t embroidered like the ones I found online. I found some cheap low top white tennis shoes for around $10. I already had the other supplies! Can’t beat a speciality pair of shoes for $10!
Like I mentioned in my post on the cruise shirts I made, one of my new favorite methods is freezer paper and fabric paint.
Next, I went to Mark and Graham and made a monogram. I put it into my Silhouette software and cut my freezer paper. I had to iron the freezer paper on the tongue of the shoes which was a little bit of a challenge, but I got it. Make sure to take the tags off the tongue, the ones I bought were stitched on so this was pretty easy. After I ironed the stencil I had made from the freezer paper, I used matte black fabric paint. I let it dry completely before I peeled off the stencil, then I hit it lightly with the iron. I was very satisfied with how they turned out.

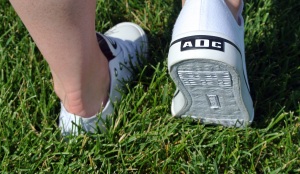
After I was done I thought how cute it would be do add a little monogram to the back. I painted the back square where the name of the shoes were with black acrylic paint. After they were dry I cut my tiny monograms with white permeant vinyl. I used my tweezers to apply them to the backs of my shoes.

They are so cute! Can’t wait to wear them this summer!
